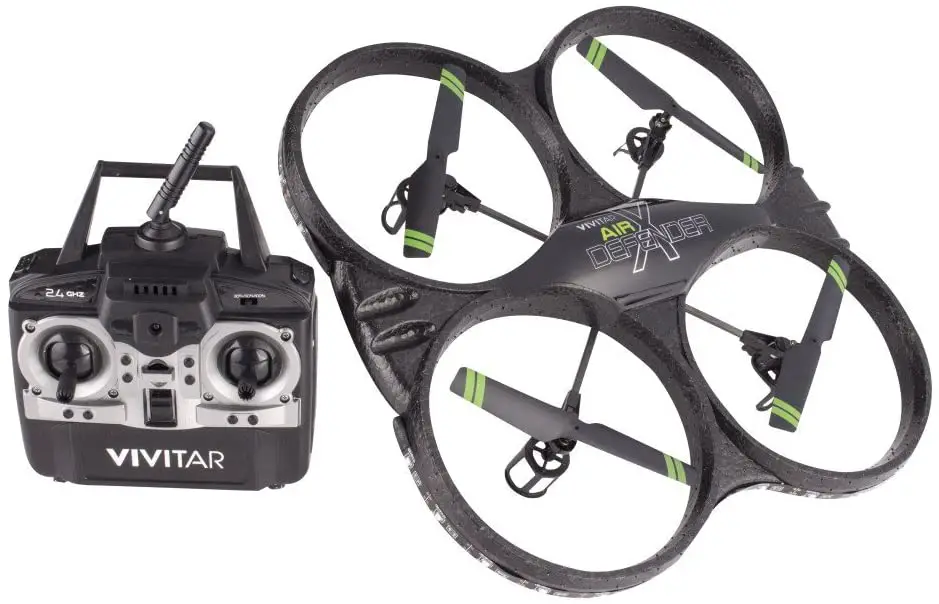
Vivitar Air Defender X Camera Drone If you’re like me, you’ve probably been intrigued with the potential of drones over the past few years but put off by the steep price of entry to buying one. While drones’ prices have continued to come down, and their sophistication and functionality have gone up, it can still be a bit intimidating to think about purchasing one and learning to fly it.
Fortunately, some new options make it easier to buy in and discover what it is like to use one of these things in the field. For instance, the Vivitar Air Defender X Camera Drone is an affordable and fun UAV with a lot of the same options as other drones but at a fraction of the price.
Okay, before I go too far into my thoughts on the Air Defender, let’s clarify what this drone is and is not. For example, it is not a competitor to the DJI Phantom line of drones, larger, more powerful, and definitely more pricey. Instead, this is a lightweight, easy to fly, and very affordable entry-level drone that you’ll probably have a lot of fun with.
Checking out the specs on the Air Defender, you’ll discover that it has many options for the price. For instance, it comes equipped with a 16.1 MP camera capable of streaming video and images to your smartphone when it connects to the drone via WiFi.
It also has a range of about 200 meters and a flight time of about 20 minutes when using the two supplied batteries. It is also wrapped in 64 individual LED lights, making it easy to spot even in dark conditions. This also gives it a fun, unique look that helps in navigation too.
Inside the box, you’ll find the Air Defender itself, a full-featured remote control, complete with a smartphone holder, two rechargeable batteries for the drone, a set of regular AA batteries for the remote, and a USB recharging cable.
It takes about 2 hours to charge one of the batteries using the proprietary USB cable, so when you get the drone home, you’ll have to be patient for a bit before you start using it. I’d recommend charging both batteries before making your first flight because you’ll burn through the rechargeable battery pack quite quickly, and you’ll want to be able to put the second one in and fly some more before you run out of juice.
Piloting the Air Defender takes a bit of time to master, in part because it is surprisingly quick. There is a switch on the remote that allows you to limit the aircraft’s speed to 30, 60, or 100%, and I definitely recommend keeping it on the slower speed when you first start. I expected the 30% setting to be slow and easy to master when starting out, but it was surprisingly quick even in that setting. At 100% power, you’ll want to have plenty of room, because it is fast, fast, fast.
After some practice, you’ll start to get the hang of flying this drone, as the controls work as you would expect for the most part. The only issue I had was getting the drone to fly at a level height, as the joystick on the remote that controls vertical doesn’t have a “return to zero” setting. This would have come in very handy, but instead, I often find myself having to make minute adjustments to the stick just to get the drone to fly at a height that I would like.
If you don’t want to use the included remote to pilot the drone, you can also connect it to your Android or iOS device via an app. This gives you the ability to fly the UAV as well and activate its camera.
In fact, you can actually get a drone’s eye view of the flight right on your mobile device’s screen. This is a lot of fun and gives you the option to snap photos or capture video footage. I preferred using the actual remote control but would have still like to have been able to use my iPhone as a screen and control the camera. I haven’t figured out if it is possible to do this, however, as it appears that only one of the remotes can be used at a time.
As you’ve probably noticed, there is one word that keeps appearing in this review over and over. That would be the word “fun.” That’s because it is the best way to describe what it is like to fly the Air Defender, and judging from the crowds that gather when I break it out, a lot of people seem to find it enjoyable to watch as well. While it may be true that this isn’t a professional-grade drone used for filmmaking and photography shoots, it is still just a blast to fly it around, capturing images of your own.
As fun as it is to fly, the absolute best part of the Air Defender just might be the price. The drone costs just $99, which is well below the entry fee for most other drones with a decent set of features. Basically, for $100, you can get a UAV that gives you a taste of what the more expensive drones can do, allowing you to consider investing in something more sophisticated or simply enjoying the aircraft for what it is. That alone makes this worth consideration.
You can probably tell that I have really enjoyed flying the Vivitar Air Defender X Camera Drone. Yes, it has some limitations, but it also has a surprising amount of technology packed in. As long as you go in knowing that, I’ll bet you’ll have fun with this drone too. Honestly, it’s hard not to like it.
- Gear Review: The Xero Scrambler Mid is an Ultralight Hiking Shoe for Spring - March 1, 2023
- Gear Review: Yeti Roadie 48 Wheeled Cooler - August 18, 2022
- Kristin Harila Continues Pursuit of 8000-Meter Speed Record - August 16, 2022
This looks fantastic! I'm a keen sandboarding blogger who'll in the future will need something like this to take good photos and videos around sand dunes to get an idea of height, distance of the dune range, places with good slopes, etc… Do you think this will be suitable for my needs and if so, is shipping available to the UK?
You actally can use the camera with the app on your smartphone and fly it with the remote at the same time.
Turn the drone on. Turn the remote on and let them sync like you werent gonna use the camera. THEN….Connect to the wi fi from the drone and open the app. You should be seeing the camera now on the screen. There is a button at top of screen that says on. Hit it and it changes to off and the throttle and directional disappear. Now you can just use the phone as a video monitor and use the remote to control the drone. Hope this helps. Mikey
I can't get the remote controller to work
That's how mine was I gave it a little bang and it came on you don't half to hit hard
Nice initial review, Thanks!
I just bought this and i cant get it to hover straight up or straight down. It always lift and tilt why is that? It nevera stay on a steady hover….can someone please help
You have to use the trim buttons those are the little buttons by the control knobs each set represent each control… set drone as if you were gonna fly set controller to 30 percent then increase throttle just enough to where it wants to take off but dont leave the ground you will notice it wanting to move in a direction, with the trim buttons if the drone is wanting to move backward press the button that is represented as forward by the joystick one press at a time u will notice it will start to level out and you do this with every control button until trimmed when trimmed to the best u can on the ground u will notice it to start to free float like a puck on a airhockey table once there take off to a hover and trim settings one beep at a time until set to a desired operation once complete you should only have to make minor changed every once in awhile
Bought this drone very fun to fly. However im not sure to recomend this drone because of the remarkably short flight time it has,after fully charging the battries the flight time was about ten mins at best after using both of the batteries not sure where the author got twenty.
Other then that it is a very easy UAV to fly, is very fast good camera and very durable.
I was getting between 8-10 minutes of flight time per battery during my testing.
How did you manage that and does anyone know what batteries fit this drone would love to get a 1000 mah bat or higher
Anyone have a link to a more powerful bat fir this uav? Looking for 1000 mah or higher i use this drone for training hoping toget a phantom for dronography
I believe it depends on your flight conditions and how fast you're going. Higher winds will cause it to have to struggle to maintain flight, and go through battery life more quickly. Also, I tend to fly it on the lowest speed settings (30%) which should increase battery life as well. All I know is that I generally get 8-10 minutes per pack.
Does anyone know the total weight of this drone
Does anyone know the weight of this drone/quadcopter
How do you get all the propellers to work on it because mine will not work all at the same time
How do you share the videos I can't get them to share the only option is to delete?
How do you reboot this drone?
I just received this vivitar airbender I alsoam having to get all 4 motor to work together especially when im just setting on the ground at lowest throttlespeed
How do you insert the SD card.
Remove all styrofoam and LED light strips, reduces weight and power consumption. Next push both batteries in to opposite sides of holder with their wires aimed so as to both come out at the middle, the extra batteries weight will compensate for removed styrofoam case, I re-added the plastic top to protect circuit board. Splice the wires by removing end terminals from plastic housing on one battery and pry open the metal end some from an O to a U shape, strip small amount of coating from other batteries wires so you can push the first batteries U clip over SAME COLOR wire of second battery then use pliers to crimp shut, super glue the batteries so they can't slide out of drones holder. You will need to super glue motor arms in place, theoretically you could swap blades and arms with pieces that rotate for collapsing, to increase shock resistance.
The camera picks up IR really well too, aim a TV remote at while pushing buttons on remote, video on your phone will show bright violet light.
nice
How do you get live video while flying on android app's
Yes I have been having the same problem. Did you figure it out? The live feed works no problem on all iOS devices but on the android when you hit "play" it's just a black screen or is says "connected to wrong wifi" but it's the correct one
Same thing is happening to mine to. Just a black screen. Did you figure it out?
When I plug then battery into the drone the red light comes on but the LED lights will no longer turn on and It seems once they stopped working thats when the drone stoppped flying. Anyone have any solutions to this problem or experience this as well?
When I need to control the lateral wind force I prefer to change to 60%, it give me more drone control.
My camera on the drone has red coloring and I don't know why
Are you sure its not just from the red LEDs on the front of quadcopter
Does anyone know how to connect to the wifi ? And if what type of wifi do i use please help i want to live stream it.
When I connect to drone with phone and WiFi..it says connected but no internet….how do I fix this?? Please help
When I connect to drone with phone and WiFi..it says connected but no internet….how do I fix this?? Please help
Thanks
I flew this drone 2 times with the app and both times my phone recognised the WiFi to connect to it. But now my phone or any phone picks up no WiFi signal from the done. Like its not sending one. And it may not be but why would it stop? I can't fly it if I can't connect to it. Does anyone know of anything that might get a signal back or is it just broke?